Руководство по установке изделий серии LONGJOIN
Step by step Installation For All Direct Wire-In & Locking-Type Photocontrols
1. Turn off power
2. Line voltage must be the same as indicated on the photocontrol label
3. Position and mount the photocontrol so that no artificial light will cause the control to accidently turn off at night. If light from the controlled lamp shines on the cell, the control will cycle (turn on and off repeatedly)
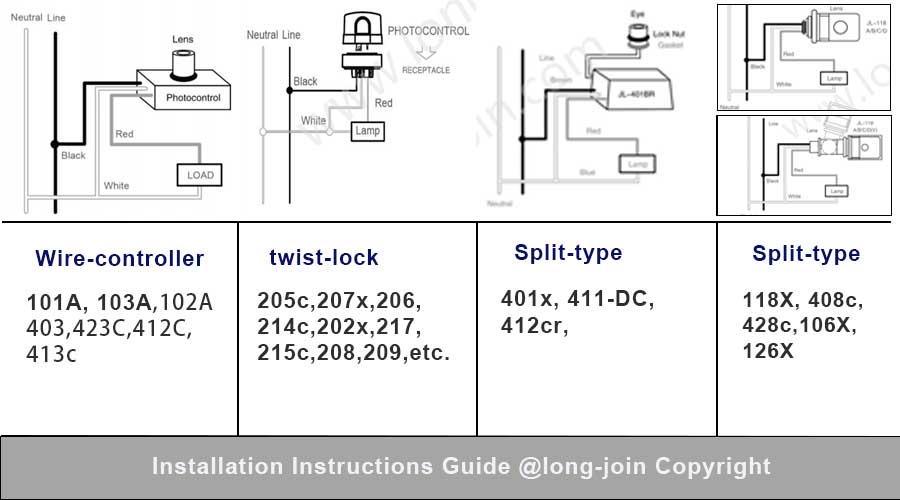
a. Refer to the wiring diagrams below and choose the appropriate diagram.
b. Connect the Black wire (Hot Line) to the Black wire of the photocontrol.
c. Connect the Black wire of the light fixture to the Red wire of the photocontrol.
d. For 120 volt units: Connect the White wire from the light fixture and the White wire from the photocontrol to the Neutral wire.
e. For 208V, 240V, 347V or 480V Units: Connect the White wire from the light fixture and the Yellow wire from the photocontrol to the Common wire (208V, 240V, 347V, 480V, Red wire; 277V White wire).
f. Check all connections and make sure that there are no bare wires exposed
3. turn power on
6. Light fixture will turn on initially and then turn off within 2 minutes if the photocontrol is tested in daytime. If light fixture is tested at night, use a flashlight and shine the light directly on the cell. The light fixture should turn off in less than 2 minutes.
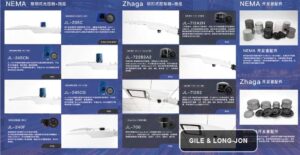
7. If the photocontrol is equipped with an external slide clip (JL-106, JL-126, JL-118A ,JL-428C) the light fixture can be turned on earlier at night by moving the slide clip to partially cover the cell window. The cell window completely covered by slide results in the earliest turn on.
8. Product Nos. JL-103A & JL-403C are mounted by means of a threaded nipple. Place the gasket over the nipple, insert the nipple through the hole of the enclosure and screw on the nut tightly enough to create a weatherproof seal. If the enclosure surface is curved or uneven, apply silicone rubber sealing compound between the enclosure hole and the nipple to make a weatherproof seal. The body of the control must be located in a weatherproof enclosure. Only the photocontrol lens and threaded nipple are watertight.
9. All other photocontrols (Nos.JL-118AV, JL-126AV, JL-106V, JL-428V ) must have a sealing compound, such as, Duxseal or RTV silicone rubber applied around the threaded stem of the photocontrol so that it is rain tight. To ensure rain tightness, run the locknut all of the way up the threaded stem while applying sealing compound to the threads. Orient photocontrol and fully tighten locknut.
10. When mounting photocontrol to an enclosure or light fixture where condensation may occur, be sure that the control is oriented so that the wires exiting the photocontrol are pointed downward and route the wires to form a drip loop.
11. Should you have difficulty during installation, we suggest that you refer to the following:
| Проблема | Cause | Решение |
| Light fixture remains ON at all times | Incorrectly wired.
| Refer to wiring diagram. Replace photocontrol with unit of the correct voltage rating. Replace photocontrol and connect only to a permissible load. Reposition photocontrol in the direction of the most natural light. Consult local utility to check voltage and take corrective steps. |
| Light fixture remains OFF at all times | Incorrectly wired.
| Refer to wiring diagram. Replace photocontrol with unit of the correct voltage rating. Consult local utility to check voltage and take corrective steps. |
| Light fixture blinks during the day, but, remains ON at night. | Incorrectly wired | Refer to wiring diagram |
| Light fixture blinks during the day, but, remains OFF at night | Incorrectly wired.
| Refer to wiring diagram. Reposition photocontrol so that it is not subject to any artificial light. |
| Fuse blows when power is connected | Incorrectly wired. | Refer to wiring diagram. |
| Photocontrol operates normally for a short time and then remains ON | Contacts welded together due to an excessive load. | Replace photocontrol and connect only to a permissible load. |